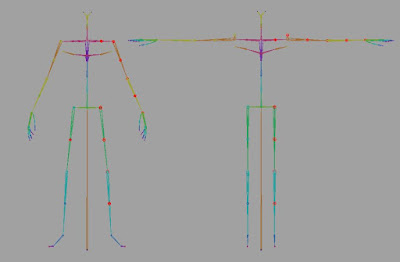
Initial layout is done in a relaxed model pose as it's not practical for character artists to model in the T pose (also known as the Jesus pose) that you use as the starting point for a control rig. This tends to be with arms at around 45 degrees, elbows slightly bent, legs and feet pointing out slightly. Being able to manage and switch between model and T poses will really help your work flow and will be the subject of my next post where I'll cover the pose manager tool I use for this.
 |
| The same skeleton in model pose (initial layout) and T pose (ready for rig construction) |
This is the basic process of skeleton layout.
- Decide on your joint orientation (easy, unless it's your first rig)
- Lay out joints to fit model in relaxed pose
- Ensure all joints have 0,0,0 rotation values and clean translate channels
- Pay attention to your axis - consistency across your skeleton is important
- Rotation orders - deserves a post in itself so I'll talk about this later
- Mirror joints for arms and legs
- Quick test-bind and tweak joint positions if necessary
- Set skeleton T-pose
My joint orientation preference is YZX so the Y axis points along the joint length, but really the key is consistency of joint behaviour both within a rig and also across multiple rigs in a project so pick one and then stick with it. There are two general points to remember here, 1) You should be able to select every joint in a chain and have them bend in the same direction when you rotate in a single axis. 2) Behaviours should correspond across different limbs in the same rig, so for example rotation in X should rotate the arms forwards, legs forwards and spine forwards - consistency of rotation behaviour is the aim. Of course there will be exceptions to this rule from time to time...
Layout
When deciding where to position your joints don't assume that the anatomically correct position will give you the best result. As a rule of thumb, halfway between a position central to the mesh and true anatomically correct position is a good starting point for areas such as the spine. For arms and legs with roll joints set up you will find that very off-centre joint positioning will give undesirable deformation when twisted. It's a bit of a balancing act and within the limitations of producing assets for a game environment whatever you do is a generally a compromise of some sort.
Keep it clean
The basic aim is to end up with a skeleton that has clean translate and rotate values. For mid-chain joints (knee, ankle, ball, arm, elbow, wrist etc. etc.) this means that the only none-zero translate value should be on the down-axis (Y, if you choose YZX orientation). For joints such as the shoulder, upper leg and first finger joints you will have values in all translation attributes. Rotation values should always be 0,0,0 with orientation values being stored on the joint orient attribute. In my next post we'll set up a T pose for the skeleton, still keeping 0,0,0 rotation values, and I'll cover my pose manager tool that allows easy switching between stored poses on a skeleton.
Generally I like to create my initial chain of joints by shift-clicking in an orthographic viewport. This guarantees me the cleanest possible starting point by giving a perfectly straight chain of joints. Orientating joints to fit the model via the joint orient channels can be tricky so you can use the rotation tool and then freeze rotations on the joint to transfer rotation values to joint orientation channels.
Align joint axis to the mesh
Make sure your joint axis are aligned to the mesh. For example, ensure that the elbow joint is orientated such that only a rotation in a single axis is required to bend the elbow at the correct angle. Also check that shoulders/arms/legs etc. etc. can be rotated forwards/back and up/down on a single axis. Essentially what we're trying to do here is ensure that when it comes to animating the character that general directions of movement correspond to a single axis as this makes the animation curve editor easier to read. You'll also find it much easier to set up the control rig with nice, easily understandable joint axis.
Mirroring, final checks and test bind
Mirror your arms and legs, make sure you have behaviour as mirror type.
Now is the time to do a test bind so you can resolve any major problems with joint placement while it's still easy to fix. Double check your joint axis too making sure basic movements such as rotating an elbow/knee or lifting the arm up in a straight line uses only a single rotation axis.
The point that can't be made enough is to ensure your skeleton is as clean as possible and that your joints are orientated as optimally as they can be. Every ten minutes you spend at this stage being obsessive-compulsive about your layout has the potential to save you hours or even days of heartache later on.


excellent i follow ur blog u r good man
ReplyDeleteWow, excellent post. I'd like to draft like this too - taking time and real hard work to make a great article. This post has encouraged me to write some posts that I am going to write soon. skeleton dress costume
ReplyDelete